Building Instagram-like Transitions
In this guide we'll recreate the transition Instagram uses when you tap a video in your feed and it smoothly expands into a full-screen Reels viewer. When you go back, the video shrinks back into its original position — all without interrupting playback.
We'll use iOS as our reference and replicate the transition across iOS, Android, and web, so that navigation on all three platforms delivers the same polished experience.
How it works — the big picture
The core idea is simple: there is only one video instance, and we move it between screens.
Traditional navigation would unmount the feed screen's video and mount a brand-new one on the Reels screen. That causes a visible flash, resets playback, and makes a smooth transition impossible.
With react-native-teleport, we take a different approach:
- The video lives inside a
<Portal>in the Feed screen. - When the user taps, we teleport the video to an overlay layer that sits above all screens.
- While in the overlay, we animate the video from its card size to full-screen.
- Once the animation completes, we teleport the video into a
<PortalHost>inside the Reels screen. - Going back reverses the process: teleport to overlay → animate back to card size → return to feed.
Because the video is re-parented (moved in the native view hierarchy) rather than unmounted/remounted, playback is never interrupted, animations stay alive, and the transition feels seamless.
Feed (in-place) ──tap──▶ Overlay (animating) ──done──▶ Reels (in-place)
                                                              │
                         Overlay (animating) ◀──back──────────┘
                             │
Feed (in-place) ◀──done──────┘
Prerequisites
This guide assumes you have a React Native project with the following libraries installed:
react-native-teleport— the star of the show@react-navigation/native-stack— for navigation (but you can use any navigation library)react-native-reanimated— for smooth animationsreact-native-video— for video playback (but you can use other libraries)zustand— for lightweight state management
Step 1: Build the basic layout
Let's start with a static feed — no navigation, no transitions, just layout.
Define constants
First, define the dimensions we'll use throughout:
import { Dimensions } from "react-native";

export const SCREEN_HEIGHT = Dimensions.get("screen").height;
// instagram doesn't stretch video/images feed to full screen width on web
// so `540` max width for web
export const SCREEN_WIDTH = Math.min(Dimensions.get("screen").width, 540);
export const ASPECT_RATIO = 3 / 4;
export const VIDEO_HEIGHT = SCREEN_WIDTH / ASPECT_RATIO;
export const CARD_HEIGHT = VIDEO_HEIGHT + 100; // video + social section below
Define post data
Create a simple data model for posts. Each post can have either a video or a photo:
export type PostType = {
  id: number;
  author: string;
  text: string;
  likes: number;
  comments: number;
  video?: ReturnType<typeof require>;
  photo?: string;
  date: string;
  sent: number;
};

export const posts: PostType[] = [
  {
    id: 1,
    author: "kirillzyusko",
    text: "Magic forest",
    likes: 126,
    comments: 12,
    sent: 31,
    video: require("./videos/forest.mp4"),
    date: "29 October",
  },
  // ... more posts
];
Build the Post component
Each post card shows a video (or image) with a social section underneath:
import { View, StyleSheet, Image } from "react-native";
import Video from "react-native-video";
import {
  VIDEO_HEIGHT,
  SCREEN_WIDTH,
  ASPECT_RATIO,
  CARD_HEIGHT,
} from "./constants";
import SocialSection from "./components/SocialSection";

const Post = ({ post, active }) => {
  return (
    <View style={{ height: CARD_HEIGHT }}>
      <View style={styles.container}>
        {post.video && (
          <Video
            source={{ uri: post.video }}
            style={styles.video}
            repeat
            paused={!active}
            controls={false}
            resizeMode="cover"
          />
        )}
        {post.photo && (
          <Image
            source={{ uri: post.photo }}
            style={{
              height: VIDEO_HEIGHT,
              width: SCREEN_WIDTH,
              aspectRatio: ASPECT_RATIO,
            }}
          />
        )}
      </View>
      <SocialSection post={post} />
    </View>
  );
};

const styles = StyleSheet.create({
  container: {
    height: VIDEO_HEIGHT,
    width: "100%",
  },
  video: {
    flex: 1,
    objectFit: "cover",
  },
});

export default Post;
import { FontAwesome6 } from "@react-native-vector-icons/fontawesome6";
import { View, Text, StyleSheet } from "react-native";
import type { PostType } from "../posts";

type SocialSectionProps = {
  post: PostType;
};

function SocialSection({ post }: SocialSectionProps) {
  return (
    <View style={styles.container}>
      <View style={styles.row}>
        <View style={styles.iconGroup}>
          <View style={styles.icon}>
            <FontAwesome6 name="heart" size={24} />
            <Text style={styles.iconText}>{post.likes}</Text>
          </View>
          <View style={styles.icon}>
            <FontAwesome6 name="comments" size={24} />
            <Text style={styles.iconText}>{post.comments}</Text>
          </View>
          <FontAwesome6 name="paper-plane" size={24} />
        </View>
        <FontAwesome6 name="bookmark" size={24} />
      </View>
      <View style={styles.authorSection}>
        <Text style={styles.author}>{post.author}</Text>
        <Text style={styles.description}>{post.text}</Text>
      </View>
      <Text style={styles.date}>{post.date}</Text>
    </View>
  );
}

const styles = StyleSheet.create({
  container: {
    margin: 12,
  },
  row: {
    flexDirection: "row",
    justifyContent: "space-between",
  },
  iconGroup: {
    flexDirection: "row",
    gap: 14,
    alignItems: "center",
  },
  icon: {
    flexDirection: "row",
    alignItems: "center",
    gap: 6,
  },
  iconText: {
    fontWeight: "600",
  },
  description: {
    fontWeight: "400",
    color: "black",
  },
  date: { paddingTop: 4, color: "#5c5c5c" },
  authorSection: {
    paddingTop: 8,
    flexDirection: "row",
  },
  author: {
    fontWeight: "700",
    paddingRight: 4,
  },
});

export default SocialSection;
Build the Feed screen
For simplicity, we'll use a plain ScrollView without any virtualization. In a real app you'd most likely use FlatList/FlashList/LegendList for better performance, but the goal of this tutorial is to demonstrate the idea behind the transition.
So let's create a simple scrollable list of posts:
import { useState } from "react";
import { View, ScrollView, StyleSheet } from "react-native";
import { CARD_HEIGHT } from "./constants";
import { posts } from "./posts";
import Post from "./Post";

export default function Feed() {
  const [index, setIndex] = useState(0);

  const onScroll = (e) => {
    const { y } = e.nativeEvent.contentOffset;
    setIndex(Math.floor(y / (CARD_HEIGHT * 0.75)));
  };

  return (
    <View style={styles.container}>
      <ScrollView onScroll={onScroll}>
        {posts.map((post, i) => (
          <Post active={index === i} key={post.id} post={post} />
        ))}
      </ScrollView>
    </View>
  );
}
The index tracks which post is currently visible so we only play one video at a time (the active prop pauses off-screen videos to save resources).
Build the Reels screen
The Reels screen is a vertical pager — each reel takes up the full screen and snaps into place:
import { useState } from "react";
import { View, ScrollView, StyleSheet } from "react-native";
import { SCREEN_HEIGHT } from "./constants";
import { posts } from "./posts";
import FullScreenReel from "./components/FullScreenReel";

export default function Reels({ route }) {
  const post = route.params.post;
  const reels = posts.filter((p) => p.id !== post.id && p.video);
  const [index, setIndex] = useState(0);

  const onScroll = (e) => {
    const { y } = e.nativeEvent.contentOffset;
    setIndex(Math.round(y / SCREEN_HEIGHT));
  };

  return (
    <View style={styles.container}>
      <ScrollView
        snapToInterval={SCREEN_HEIGHT}
        decelerationRate="fast"
        showsVerticalScrollIndicator={false}
        onScroll={onScroll}
        bounces={false}
      >
        <FullScreenReel post={post} active={index === 0} />
        {reels.map((p, i) => (
          <FullScreenReel key={p.id} post={p} active={index === i + 1} />
        ))}
      </ScrollView>
    </View>
  );
}
We use decelerationRate="fast", snapToInterval={SCREEN_HEIGHT}, and bounces={false} to get a snapping effect without writing much code. The result may not feel exactly like the real Instagram app, but the goal of this tutorial is to focus on transitions, not on perfecting the snapping behavior.
The tapped post is always first in the list, followed by other video posts.
Step 2: Add navigation (without shared transitions)
Now let's wire up the screens with react-navigation. The key decision here is the presentation mode for the Reels screen.
Why transparentModal?
We use presentation: "transparentModal" for the Reels screen for two important reasons:
- Visible background during transitions — When the video animates from its card position to full-screen, the feed is still visible behind it. A regular screen push would show a solid background, which isn't what we want.
- Future gesture support — If you later add a swipe-down-to-dismiss gesture, the user needs to see the feed screen underneath while dragging. A
transparentModalkeeps the previous screen rendered and visible.

Configure the navigator
// Screen options
const options = {
  Feed: {
    headerShown: false,
  },
  Reels: {
    headerShown: false,
    animation: "none", // we handle animations ourselves
    presentation: "transparentModal", // keeps feed visible behind
  },
};
Setting animation: "none" disables the default slide/fade transition because we'll drive the animation ourselves with Reanimated.
Add tap handling to Post
Make each video post navigable:
import { useNavigation } from "@react-navigation/native";
import { TouchableWithoutFeedback } from "react-native";

const Post = ({ post, active }) => {
  const navigation = useNavigation();

  const onPress = () => {
    if (post.photo) return; // only videos open Reels
    navigation.navigate("Reels", { post });
  };

  return (
    <View style={{ height: CARD_HEIGHT }}>
      <TouchableWithoutFeedback onPress={onPress}>
        <View style={styles.container}>
          {/* old code that displays the video/image content */}
        </View>
      </TouchableWithoutFeedback>
      <SocialSection post={post} />
    </View>
  );
};
At this point you have a working app — tapping a video opens the Reels screen, and calling navigation.goBack() returns to Feed. But there are two problems:
- there's no transition animation for the video;
- the video starts playing from the beginning on the new screen.
Let's fix that!
Step 3: Add the teleport infrastructure
This is where the magic happens. We need three things:
- A Zustand store to coordinate the transition state between screens
- A root-level
PortalHostto render content above all screens - A
useMeasurehook to get the tapped video's position on screen
The transition store
The store tracks everything needed to orchestrate the animation:
import {
  makeMutable,
  withSpring,
  type SharedValue,
} from "react-native-reanimated";
import { scheduleOnRN } from "react-native-worklets";
import { create } from "zustand";

interface Transition {
  destination?: string; // where the portal renders: undefined | "overlay" | "reels"
  id?: number; // which post is currently animating
  y: number; // the tapped video's Y position on screen
  progress: SharedValue<number>; // 0 = feed position, 1 = full-screen
  setDestination: (destination?: string) => void;
  setId: (id: number) => void;
  goToReels: (y: number) => void;
  goToFeed: (onFinish?: () => void) => void;
}

const SPRING_CONFIG = { mass: 3, damping: 500, stiffness: 1000 };

export const useTransition = create<Transition>((set, get) => ({
  destination: undefined,
  id: undefined,
  y: 0,
  progress: makeMutable(0),
  setDestination: (destination) => set({ destination }),
  setId: (id) => set({ id }),
  goToReels: (y) => {
    set({ destination: "overlay", y });
    const moveToReels = () => {
      set({ destination: "reels" });
    };
    get().progress.set(
      withSpring(1, SPRING_CONFIG, () => {
        scheduleOnRN(moveToReels);
      }),
    );
  },
  goToFeed: (onFinish) => {
    set({ destination: "overlay" });
    const moveToFeed = () => {
      set({ destination: undefined, y: 0 });
      onFinish?.();
    };
    get().progress.set(
      withSpring(0, SPRING_CONFIG, () => {
        scheduleOnRN(moveToFeed);
      }),
    );
  },
}));
Let's break down each field:
| Field | Purpose |
|---|---|
destination | Controls where the <Portal> renders. undefined = in-place (feed), "overlay" = floating above everything (during animation), "reels" = inside the Reels screen. |
id | Which post is being transitioned. Only the matching <Post> will teleport its content. |
y | The Y coordinate of the tapped video. Needed to animate translateY so the video slides from its feed position to the top of the screen. |
progress | A Reanimated SharedValue from 0 to 1. Drives all animations: height, translateY, opacity, etc. Using a shared value means animations run on the UI thread at 60fps and we can animate non-UI props, such as height. |
The two key methods orchestrate the transition:
goToReels(y)— Sets destination to"overlay"so the video escapes the feed's scroll container, then animatesprogressfrom 0→1. When the spring finishes, switches destination to"reels"so the video becomes part of the Reels screen.goToFeed(onFinish)— Reverses the process: destination back to"overlay", animate progress from 1→0, then clear everything and callonFinish(which triggersnavigation.goBack()).
We use Zustand instead of React Context because it gives us granular subscriptions. Each component selects only the slice of state it needs (state.id === post.id, state.progress, etc.), so only the relevant components re-render. This is critical for performance during animations.
Set up the root PortalHost
The "overlay" PortalHost must be placed at the root of your app, after the navigation container, so it renders on top of all screens:
import { StyleSheet } from "react-native";
import { PortalHost, PortalProvider } from "react-native-teleport";
import { NavigationContainer } from "@react-navigation/native";
import { GestureHandlerRootView } from "react-native-gesture-handler";

export default function App() {
  return (
    <GestureHandlerRootView style={styles.container}>
      <PortalProvider>
        <NavigationContainer>
          <RootStack />
        </NavigationContainer>
        {/* This host renders ABOVE all screens — perfect for the transition */}
        <PortalHost name="overlay" style={StyleSheet.absoluteFillObject} />
      </PortalProvider>
    </GestureHandlerRootView>
  );
}
The useMeasure hook
Before animating, we need to know where the tapped video is on screen. measureInWindow gives us the absolute coordinates:
import { Platform, type View } from "react-native";
import { useSafeAreaInsets } from "react-native-safe-area-context";

const useMeasure = (viewRef: React.RefObject<View | null>) => {
  const insets = useSafeAreaInsets();

  return (callback: (x: number, y: number) => void) => {
    viewRef.current?.measureInWindow((x, y) => {
      // Android edge-to-edge mode can produce incorrect offsets
      if (Platform.OS === "android") {
        return callback(x, y + insets.top);
      }
      return callback(x, y);
    });
  };
};

export default useMeasure;
The measured y value tells the animation system how far the video needs to translate vertically to reach the top of the screen.
Step 4: Add the <Portal> to share videos between screens
Now we connect everything. This is where <Portal> and <PortalHost> bring the transition to life.
Update the Post component
The Post component is the heart of the transition. It wraps the video in a <Portal> whose destination changes based on the transition state:
import { View, StyleSheet, Image } from "react-native";
import Video, { ViewType } from "react-native-video";
import { Portal } from "react-native-teleport";
import { TouchableWithoutFeedback } from "react-native-gesture-handler";
import Reanimated, {
  interpolate,
  useAnimatedStyle,
} from "react-native-reanimated";
import { useNavigation } from "@react-navigation/native";
import { useRef } from "react";
import { useTransition } from "./hooks/useTransition";
import useMeasure from "../../hooks/useMeasure";
import { VIDEO_HEIGHT, SCREEN_HEIGHT, CARD_HEIGHT } from "./constants";
import SocialSection from "./components/SocialSection";

const Post = ({ post, active }) => {
  const videoRef = useRef(null);
  const navigation = useNavigation();
  const measure = useMeasure(videoRef);

  // Subscribe to only the state slices this post needs
  const shouldMove = useTransition((state) => state.id === post.id);
  const setId = useTransition((state) => state.setId);
  const progress = useTransition((state) => state.progress);
  const goToReels = useTransition((state) => state.goToReels);
  const destination = useTransition((state) =>
    shouldMove ? state.destination : undefined,
  );
  const y = useTransition((state) => (shouldMove ? state.y : 0));

  const onPress = () => {
    if (post.photo) return;
    setId(post.id);
    measure((_x, _y) => {
      navigation.navigate("Reels", { post });
      goToReels(_y);
    });
  };

  // Animate height and position based on progress
  const frame = useAnimatedStyle(
    () => ({
      height: shouldMove
        ? interpolate(progress.value, [0, 1], [VIDEO_HEIGHT, SCREEN_HEIGHT])
        : VIDEO_HEIGHT,
      transform: [
        {
          translateY: shouldMove
            ? interpolate(progress.value, [0, 1], [0, -y])
            : 0,
        },
      ],
    }),
    [shouldMove, y],
  );

  return (
    <View style={{ height: CARD_HEIGHT }}>
      <TouchableWithoutFeedback onPress={onPress}>
        <View ref={videoRef} style={styles.container}>
          <Portal hostName={shouldMove ? destination : undefined}>
            <Reanimated.View style={[{ width: "100%" }, frame]}>
              {post.video && (
                <Video
                  source={{ uri: post.video }}
                  style={[styles.video, { top: shouldMove ? y : 0 }]}
                  repeat
                  paused={!active}
                  controls={false}
                  resizeMode="cover"
                  viewType={ViewType.TEXTURE}
                />
              )}
              {post.photo && (
                <Image source={{ uri: post.photo }} style={styles.photo} />
              )}
            </Reanimated.View>
          </Portal>
        </View>
      </TouchableWithoutFeedback>
      <SocialSection post={post} />
    </View>
  );
};

export default Post;
Here's what happens step by step when the user taps a video:
setId(post.id)— Marks this post as the one being transitioned. Only this post'sshouldMovebecomestrue.measure()— Gets the video's current Y position on screen.navigation.navigate("Reels", { post })— Opens the Reels screen (withanimation: "none"so nothing visible happens yet).goToReels(_y)— Setsdestination: "overlay"and starts the spring animation.- The
<Portal>now hashostName="overlay", so the video teleports from the feed to the root overlay. - The
frameanimated style grows the video fromVIDEO_HEIGHTtoSCREEN_HEIGHTand translates it upward byypixels. - When the spring finishes,
destinationbecomes"reels"and the video teleports into the Reels screen's<PortalHost>.
Why keep the container height fixed?
<View style={{ height: CARD_HEIGHT }}>
Notice that the outer <View> always has a fixed CARD_HEIGHT, even after the video teleports away. This is crucial — without it, the feed's ScrollView would reflow and jump when the video disappears, changing the scroll position and potentially switching which video is considered "active."
Add a PortalHost in the Reels screen
The first reel (the one the user tapped) needs a <PortalHost> to receive the teleported video:
import { View, StyleSheet } from "react-native";
import Video from "react-native-video";
import { Portal, PortalHost } from "react-native-teleport";
import {
  SCREEN_HEIGHT,
  SCREEN_WIDTH,
  FLOATING_ELEMENTS_DESTINATION,
} from "../constants";
import { useTransition } from "../hooks/useTransition";
import Reanimated, { useAnimatedStyle } from "react-native-reanimated";

function FullScreenReel({ post, active, portal = false }) {
  const progress = useTransition((state) => state.progress);
  const destination = useTransition((state) => state.destination);

  const icons = useAnimatedStyle(
    () => ({
      opacity: progress.value,
    }),
    [],
  );

  return (
    <View style={styles.container}>
      {portal ? (
        // This host RECEIVES the teleported video from the feed
        <PortalHost name="reels" style={styles.container} />
      ) : (
        // Other reels render their own video directly
        <Video
          source={{ uri: post.video }}
          style={styles.video}
          paused={!active}
          resizeMode="cover"
        />
      )}
      {/* Action buttons (like, comment, share) */}
      <Portal
        hostName={
          portal && destination === "overlay"
            ? FLOATING_ELEMENTS_DESTINATION
            : undefined
        }
      >
        <Reanimated.View style={[styles.icons, icons]}>
          {/* ... like, comment, share buttons ... */}
        </Reanimated.View>
      </Portal>
    </View>
  );
}

export default FullScreenReel;
The portal prop distinguishes the first reel (which receives the teleported video) from subsequent reels (which render their own inline video). Only the first FullScreenReel renders a <PortalHost name="reels"> instead of a <Video>.
The action buttons (like, comment, share) are also portaled to the overlay during the transition so they fade in correctly on top of the animating video.
Update the Feed and Reels screens to disable scroll during transitions
Both screens need to lock scrolling while the animation is in progress. Otherwise, the user could scroll the feed while the video is mid-flight:
import Reanimated, { useAnimatedProps } from "react-native-reanimated";
import { useTransition } from "./hooks/useTransition";

export default function Feed() {
  const progress = useTransition((state) => state.progress);

  const animatedProps = useAnimatedProps(
    () => ({
      scrollEnabled: progress.value === 0, // only scroll when fully on feed
    }),
    [],
  );

  return (
    <Reanimated.ScrollView animatedProps={animatedProps}>
      {/* posts */}
    </Reanimated.ScrollView>
  );
}
const animatedProps = useAnimatedProps(
  () => ({
    scrollEnabled: progress.value === 1, // only scroll when fully on reels
  }),
  [],
);
Add the ReelsHeader with back navigation
Instagram uses a custom header in its app, and we'll build one too. The header animates alongside the video — it fades in and slides down from the video's original position:
import {
  View,
  Text,
  TouchableOpacity,
  StyleSheet,
  BackHandler,
} from "react-native";
import { useSafeAreaInsets } from "react-native-safe-area-context";
import { useNavigation } from "@react-navigation/native";
import Reanimated, {
  interpolate,
  useAnimatedStyle,
} from "react-native-reanimated";
import { Portal } from "react-native-teleport";
import { FLOATING_ELEMENTS_DESTINATION } from "../constants";
import { useTransition } from "../hooks/useTransition";
import { useCallback, useEffect } from "react";

function ReelsHeader() {
  const insets = useSafeAreaInsets();
  const navigation = useNavigation();
  const { goToFeed, progress, y } = useTransition();

  const onGoBack = useCallback(() => {
    goToFeed(navigation.goBack);
  }, [goToFeed, navigation]);

  // Handle Android hardware back button
  useEffect(() => {
    const subscription = BackHandler.addEventListener(
      "hardwareBackPress",
      () => {
        onGoBack();
        return true; // prevent default behavior
      },
    );
    return () => subscription.remove();
  }, [onGoBack]);

  const style = useAnimatedStyle(
    () => ({
      opacity: progress.value,
      transform: [{ translateY: interpolate(progress.value, [0, 1], [y, 0]) }],
    }),
    [y],
  );

  return (
    <Portal hostName={FLOATING_ELEMENTS_DESTINATION} style={styles.container}>
      <Reanimated.View style={[{ paddingTop: insets.top }, style]}>
        <View style={styles.header}>
          <Text style={styles.title}>Reels</Text>
          <TouchableOpacity onPress={onGoBack}>
            {/* back chevron icon */}
          </TouchableOpacity>
        </View>
      </Reanimated.View>
    </Portal>
  );
}

export default ReelsHeader;
Notice how goToFeed receives navigation.goBack as the onFinish callback. This means the actual navigation back only happens after the reverse animation completes, keeping everything perfectly synchronized.
And we need to add rendering of the header on our screen:
function Reels({ route }: Props) {
  return (
    <View style={styles.container}>
      {/* Old content, draw header on top of all elements */}
      <ReelsHeader />
    </View>
  );
}
Platform-specific rendering for floating elements
On iOS, transparentModal presentation allows UI elements to render naturally on top of the modal. On Android, we need to portal them to the root overlay explicitly:
import { Platform } from "react-native";

export const FLOATING_ELEMENTS_DESTINATION = Platform.select({
  ios: undefined, // renders naturally above the modal
  default: "root", // needs explicit portaling on Android
});
And now we can see how all pieces work together!
The complete transition flow
Here's the full lifecycle when a user taps a video and then goes back:
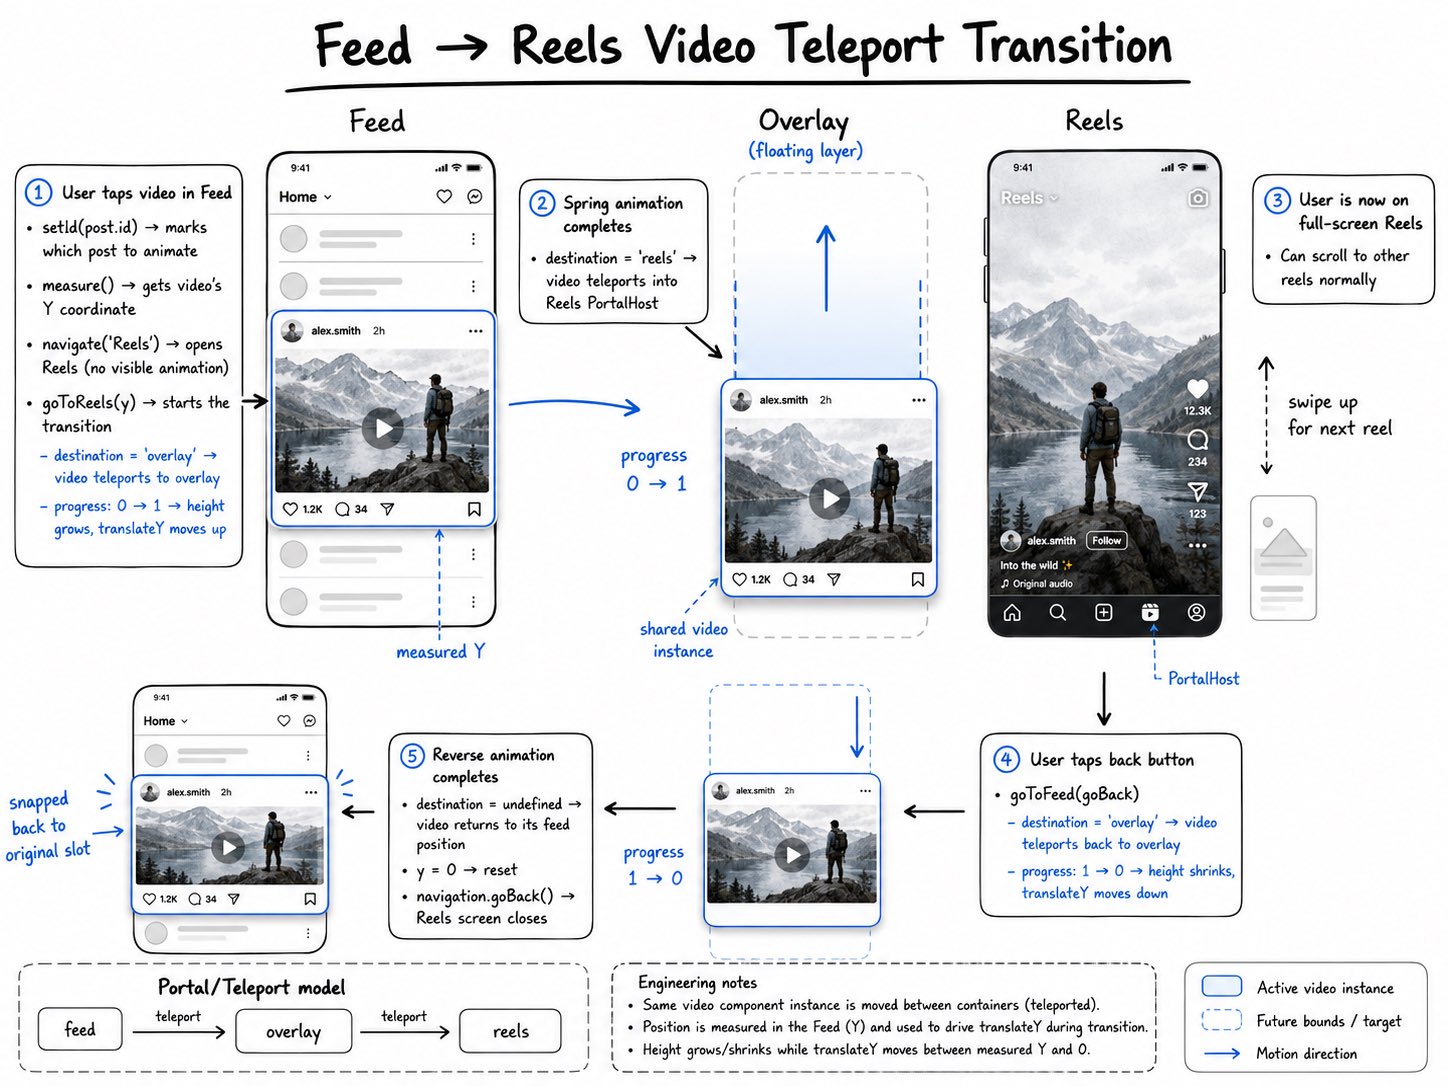
Summary
The key patterns used in this implementation:
<Portal>dynamically changes itshostNameto move the video between the feed, an overlay, and the Reels screen — all without unmounting it.- A fixed-height container in the feed preserves scroll position while the video is teleported away.
transparentModalpresentation keeps the feed visible during the transition and enables future gesture support.- A Zustand store with Reanimated
SharedValuecoordinates animation state across components while keeping everything on the UI thread. measureInWindowcaptures the video's screen position so the animation starts from exactly the right place.
With these building blocks you can create fluid, Instagram-quality shared transitions in your own app. The same pattern works for any content — images, cards, avatars — anywhere you want seamless movement between screens.
If you'd like to see the complete working code, check out the example app.